- BoostSolutions
-
Products
-
- Microsoft Teams
- HumanLike Alert Reminder
- View All Apps
- Pricing
- Support
- Company
BoostSolutions’ Bulk Zip&Unzip enable users to import an ZIP archive and extract its content into a document library. The ZIP file will not upload and store in SharePoint. More than that, if with the help of BoostSolutions’ Bulk Properties Editor, besides import the content within a ZIP file to a document library, meanwhile, you can Bulk Check In, Bulk Edit Properties for All documents or Group Edit All documents’ Properties individually after import them.
The Bulk Edit page pops up after clicking the Index contents after upload in the Import Zip Archive page, which allows you to Check In All Documents, Bulk Edit All Documents and Group Edit All Documents Individually while importing the Zip file.
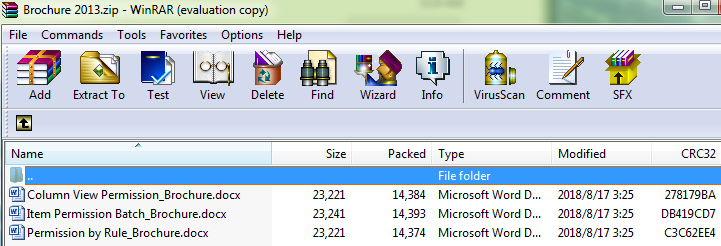
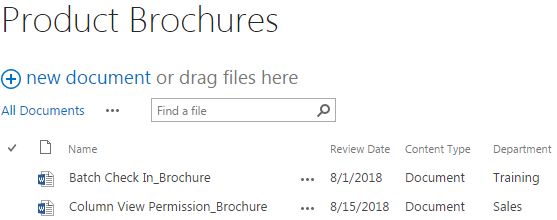
Note that the Batch Check In_Brochure and the Column View Permission_Brochure are already existed in the Product Brochures. We store these documents in the ZIP file is for showing how overwrite existing files works when we unzip/extract the ZIP file into the current location.
Download the trial version of Bulk Zip&Unzip, and install it to your SharePoint server.
Download the trial version of Bulk Properties Editor, and install it to your SharePoint server.
Navigate to the Product Brochures library prepared above.
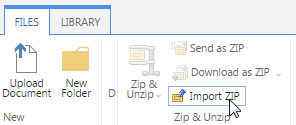
Go to FILES tab, in the Zip & Unzip group, click Import ZIP to import a ZIP archive and extract its content into this library.
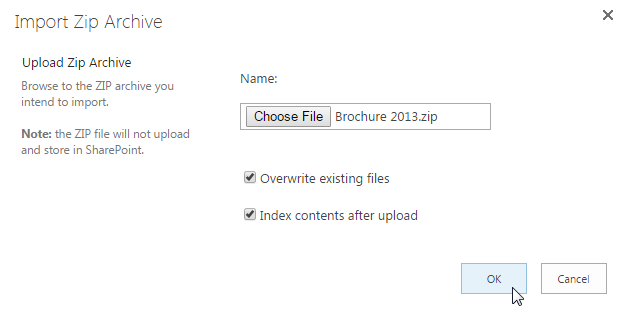
Then, the Import Zip Archive window will pop up. In the Import Zip Archive dialog, click Choose File to browse to the ZIP archive you intend to import. Note that the ZIP file will not upload and store in SharePoint, only the files within the ZIP file will be extracted and uploaded to the document library.
There are 2 options in the dialog:
Overwrite existing files: With this option checked, the existing files in the document library will be overwritten by the new extracted ones from the ZIP file under the same path if the existing documents in the document library are included in the ZIP file. If this option is unchecked, and the existing documents in the document library are included in the ZIP file, after extraction, under the same path, the existing files in the document library will stay the same, and the new extracted ones will be just ignored. Note that only existing files under the same path will be overwritten by the new extracted ones if you checked this option. This option is checked by default.
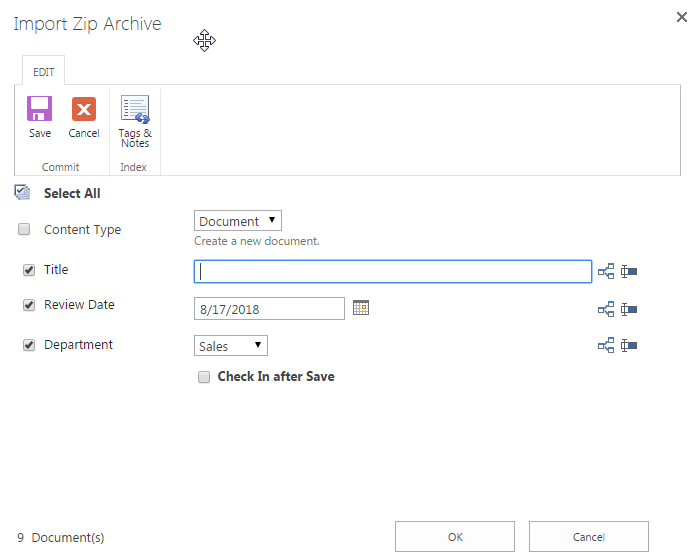
Index contents after upload: With this option checked, you will be enabled to edit document properties for the documents after they have uploaded successfully. This option will redirect you to the bulk edit page. This option is unchecked by default. Not that you must install Bulk Properties Editor to your SharePoint server to use the Index contents after upload function.

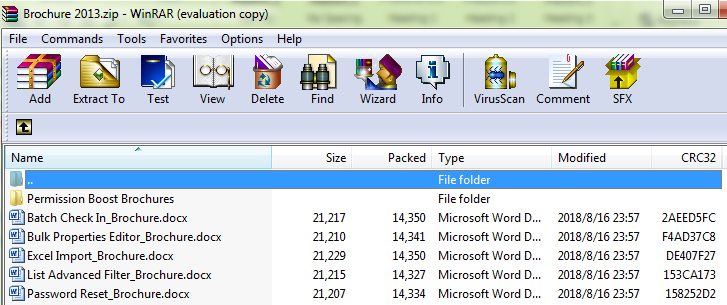
Here we select the ZIP file Brochures 2013 we prepared to import its content to Product Brochures . And let’s check Index contents after upload and click OK.
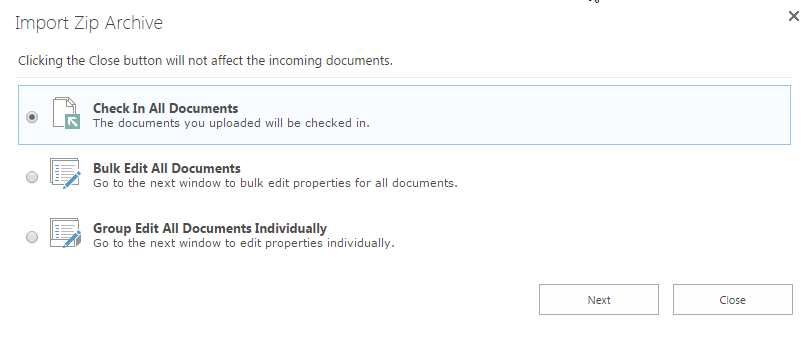
Then, after clicking OK, you will be redirected to the bulk edit page. You will be enabled to edit document properties for the documents after they have uploaded successfully. There are three options from which you can choose.
Check In All Documents: The documents you uploaded will be checked in.
Bulk Edit All Documents: You will be redirected to the Edit All window to bulk edit properties for all document.
Group Edit All Documents Individually: You will be redirected to the Group Edit window to edit properties for each document individually.
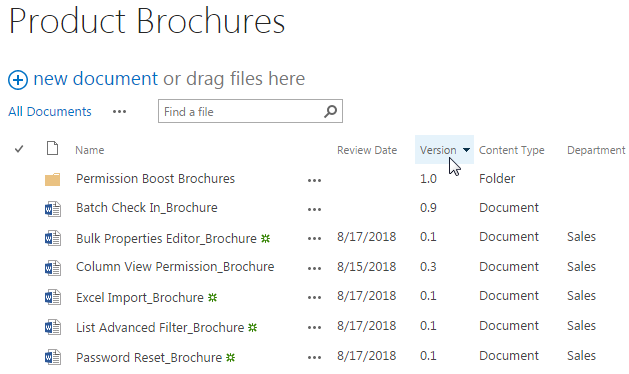
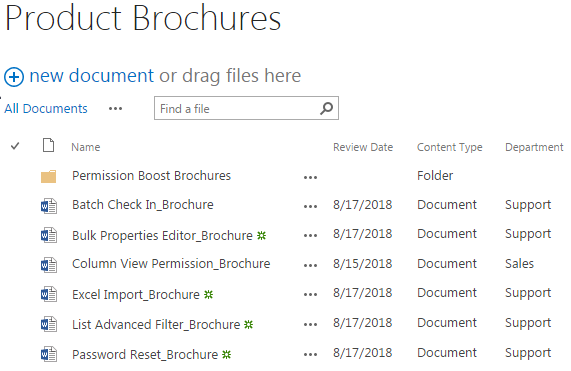
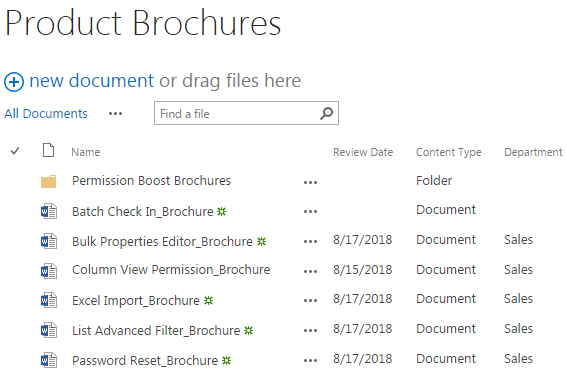
First, let’s select Check In All Documents, and click Next. After a short loading process, you will find that all documents contained in the ZIP file Brochures 2013 have been extracted and uploaded to the document library Product Brochures as following. And the structure of the document is just the same as that in the ZIP file. At the same time, all documents have been checked in after uploaded.
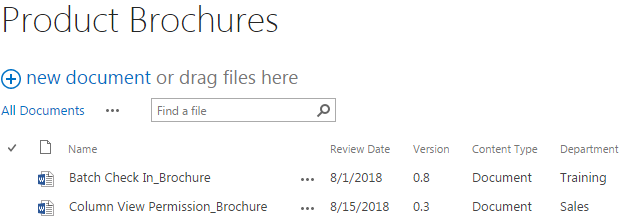
Note that the two existing documents ( Batch Check In_Brochure and Column View Permission_Brochure) in Product Brochures are included in the ZIP file Brochures 2013. After extraction, the new extracted Batch Check In_Brochure is under the same path with the existing Batch Check In_Brochure, so the existing Batch Check In_Brochure in the library will be overwritten by the new extracted one (you can see the version of Batch Check In_Brochure has been changed from 0.8 to 0.9). And there is no value assigned for Department column for the updated Batch Check In_Brochure.
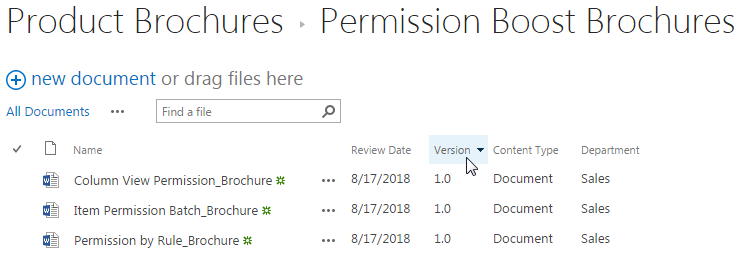
And although the existing document Column View Permission_Brochure in Product Brochures is included in the Zip file Brochures 2013 as well, but because Column View Permission_Brochure is located in a folder in Brochures 2013, after extraction, the new extracted Column View Permission_Brochure (will be located in a folder as it was) is not under the same path as the existing Column View Permission_Brochure, so the exiting Column View Permission_Brochure will not be overwritten by the new extracted one (you can see the version of Column View Permission_Brochure retains as 0.3 after the extraction). It still remains the same as it is.
The other four single documents, the Bulk Properties Editor_Brochure, the Excel Import_Brochure, the List Advanced Filter_Brochure and the Password Reset_Brochure have been extracted and uploaded to the document library with version 0.1, and the Department column has been assigned by the default value Sales. There is no version control for folders, so the version for Permission Boost_Brochures will always be 1.0, and the documents within the folder will be start with version 1.0 as well.
Now, let’s delete the Version column (it just generates new version every time you edit the document, we used the Version column for showing how overwrite existing files work, now we don’t need it, we will focus on Bulk Edit then) from the sample data. Then repeat step 1 to step 7.
And this time, let’s select Bulk Edit All Documents, and then we will be redirected to the Edit All window in which we can bulk edit properties for all imported documents.
Let’s try to bulk edit the Review Data for all document to 8/17/2018, and bulk edit the Department field to Support and leave other fields as default, then click OK.

After a short loading process, you will find that all documents contained in the ZIP file Brochures 2013 have been extracted and uploaded to Product Brochures and the Review Date and Department fields for all documents have been bulk edited accordingly except the folder as shown below. The Batch Check In_Brochure has been overwritten and the Column View Permission_Brochure stays the same.
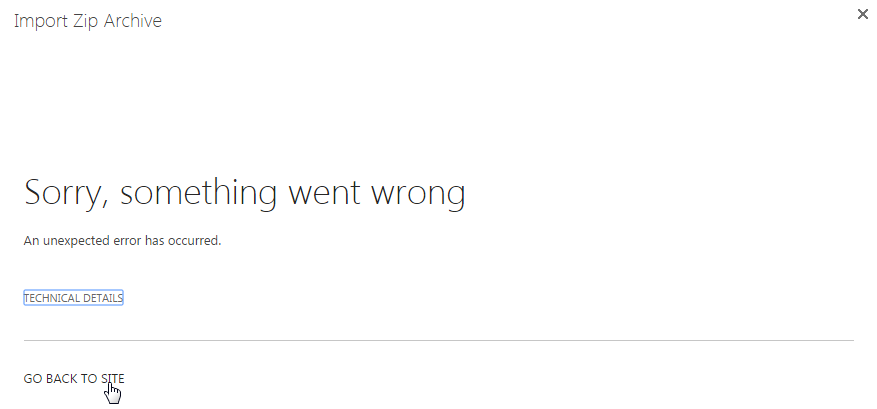
Now, let’s repeat step 1 to step 7 based on the Product Brochures in Step 9, and this time, let’s select Group Edit All Documents Individually, but this time we will receive the error message. The reason is there is a folder within the zip file, when we try to import a Zip file contains a folder in it, we will not be able to use the Group Edit function. The zip file can be imported successfully as well, we just can’t be redirected to the Group Edit page. Click GO BACK TO SITE to check the result. As you can see the folder and the documents within the zip file have been uploaded. Because the Group Edit couldn’t work, so the Review Date and Department fields for imported documents are just filled by the default value (the current date for the Review Date and Sales for the Department). The Batch Check In_Brochure has been overwritten and the Column View Permission_Brochure stays the same.
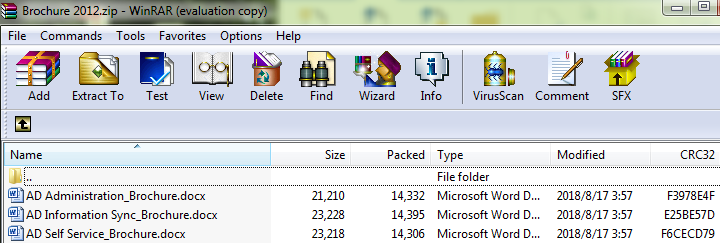
Now, let’s try to import a zip file without a folder to Product Brochure in step 9, this time, let’s change the default value for Department column to empty. Here we have a ZIP file named as Brochure 2012 with three WORD documents contained in it.
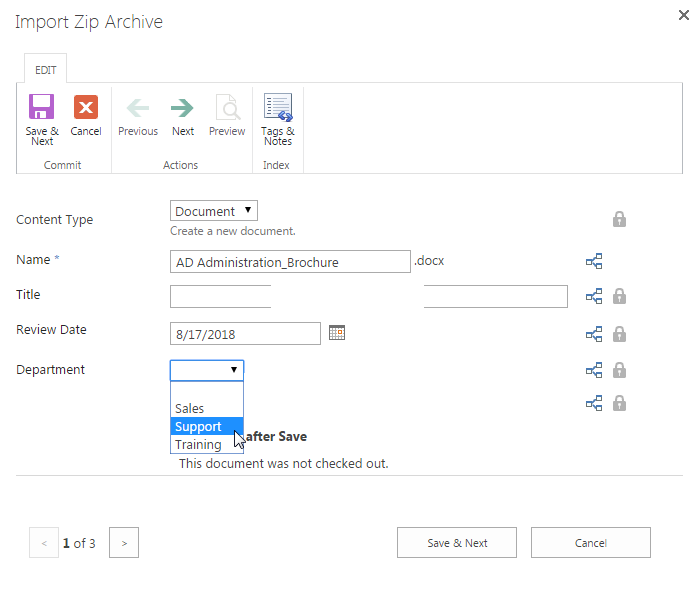
Repeat the step 1 to step 7, and again select Group Edit All Documents Individually. and then we will be redirected to the Group All window in which we can edit the properties for the three importing documents individually.
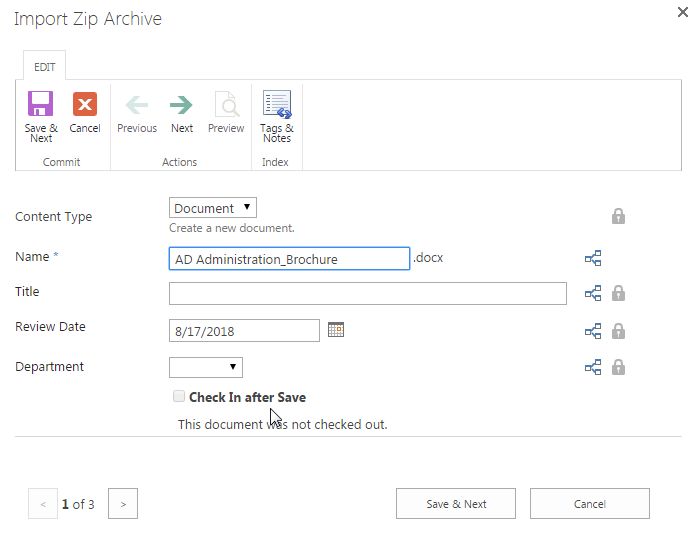
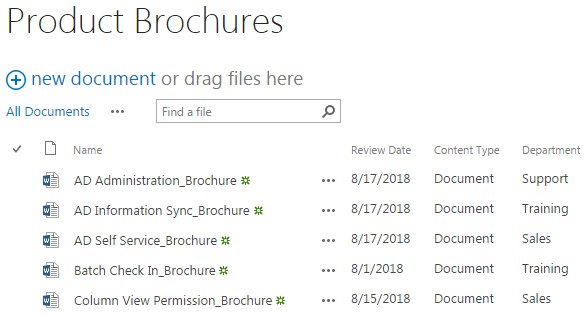
Here, let’s make modifications on the Department field for each document one by one. Keep other fields as default. Every time when finish the editing click Save & Next. When finish editing the last document click Save. Let’s change the Department value for AD Administration_Brochure to Support and click Save and Next.
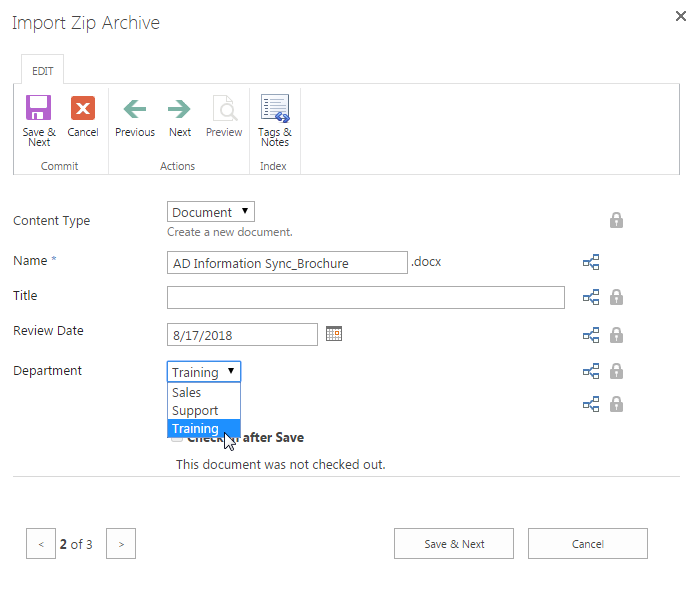
Then, let’s change the Department value for AD Information Sync_Brochure to Training and click Save and Next.
At last, let’s change the Department value for AD Self Service_Brochure to Sales and click Save.
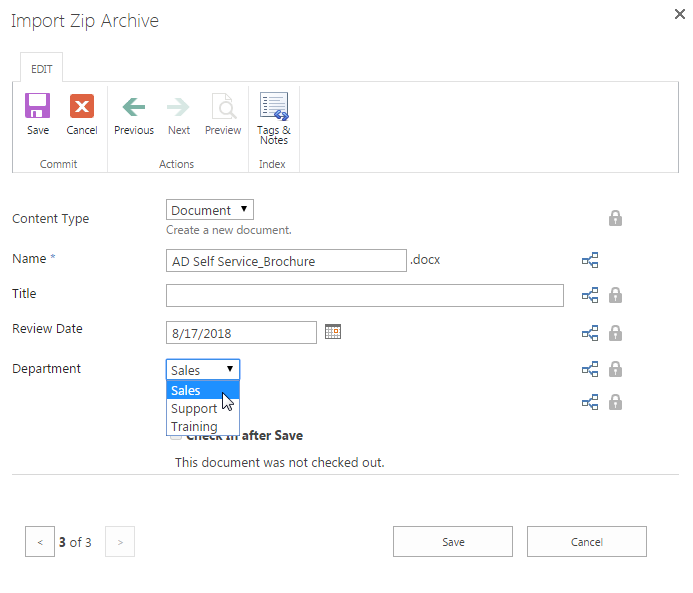
After a short loading process, you will find that all documents contained in the ZIP file Brochures 2012 have been extracted and uploaded to the document library Product Brochures and the Department field for all documents have been edited accordingly as shown below. The Review Date for these three documents are 8/17/2018 as the default value on the Group Edit page.