Introduction
User profiles provide detailed information about individuals in your organization. A user profile organizes and displays all the properties as well as documents and other items that are related to each user. In order to effectively use User Profile Services in SharePoint 2010, it should be properly configured.
Solution
To configure the User Profile Service, complete the following steps to use User Profile features.
I. Configure the Managed Metadata Service
II. Create User Profile Service Application
III. Configure User Profile Service
IV. Configure the Synchronization Connections
V. Configuring a Synchronization Timer Job
VI. Manage User Profile/Properties after completing above configurations
I. Managing Metadata Service
The User Profile service requires that the Managed Metadata Service is setup and configured first. The Managed Metadata service allows you to utilize managed metadata and provides you with the ability to share content types across sites.
1. To configure the Secure Store Service, go to:
CA -> Application Management -> Manage service applications.
2. Click New and select “Managed Metadata Service.”
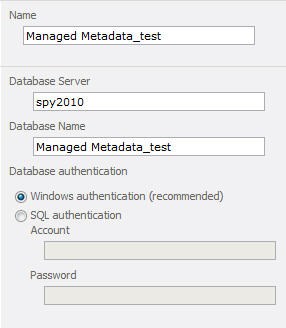
3. Enter the corresponding information for each field (Name, Database Server, Database Name, Application Pool Identity, etc.), then click the “Create” button.
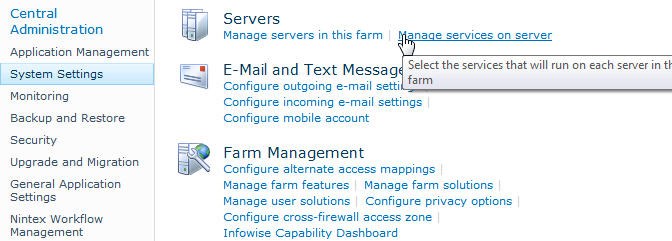
4. Lastly, enter CA > System Settings > Manage services on server and start the Managed Metadata Web Service.
5. So, the first step is completed. The next step is to configure User Profile Services on server.
II. Creating a User Profile Service
User Profile Services is the service that all UPS requests pass through.
1. To start with the second step, enter:
CA -> System Settings -> Manage services on server.
2. Scroll down and find “User Profile Service“.
3. Make sure the status of the service is displayed as “Started.” If it is stopped, then start it.
4. Starting the service will activate the service, which is a requirement prior to creating the service application.
5. To create and configure the User Profile service application, re-enter:
CA -> Application Management -> Manage service applications.
6. By default, every web application takes the default service application, but for our purpose we need to create a new User Profile service application.
7. On the ribbon, click on the Arrow below “New” and select “User Profile Service Application.”
8. Enter an appropriate application name.
9. In the “Application Pool” area, we can create a new application pool or choose an existing one.
10. For our purposes, we will create a new application and configure it with an appropriate security account.
11. We need to make sure the service account has sufficient rights on all data sources as well as network sources.
12. After filling in all details, click the “Create” button
13. Specify the Profile Database, the Synchronization Database, the Social Tagging Database, and the corresponding Profile Synchronization Instance Server.
14. Then click the “Create” button.
III. Configuring Synchronization Service
1. A User Profile service application will be created, which is “User Profile Service Application_test.”
2. We can see the status of above service is Started.
3. Goto CA -> System Settings -> Manage services on server.
4. Scroll down and find “User Profile Synchronization Service“.
5. Make sure the status of the service is displayed as “Started.” If it is stopped, then start it.
6. Starting the service will activate the service, which is a requirement prior to creating the service application.
7. Select “User Profile Service Application_test” as the User Profile Application and input the valid password of account, then click the “OK” button.
8. Before configuring the User Profile Service, we have to make sure the Forefront Identity Manager Services (FIM) are correctly configured and started in the Local System Services.
IV. Configure the Synchronization Connections.
1. Configure the User Profile Connection by going to:
CA -> Application Management -> Manage service applications.
2. Select “User Profile Service Application_test” user profile and click “Manage” on the ribbon menu.
3. There will be multiple sections related to User Profile.
4. For our purposes, click on “Configure Synchronization Connections.”

5. Click “Create New Connection.”
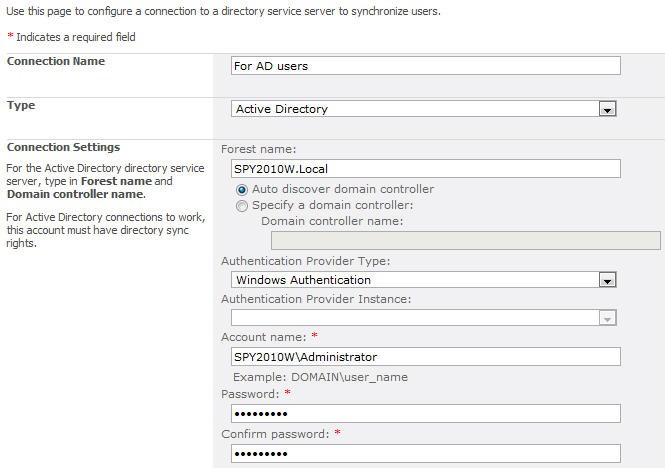
6. Enter valid values for the various fields Connection Name, Type, Authentication Provider Type, Account Name and Password.
7. Set the port with default value 389.
8. Click on “Populate Containers” and select several OU in Active Directory (the selected containers will be treated as synchronized object), then click the “OK” button.
9. The Synchronization connection has been successfully created.
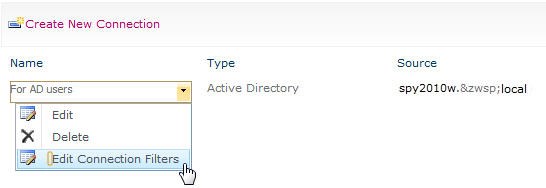
10. We can now easily setup connection filters against our Active Directory User Profile connection by clicking on the connection that was just created and selecting “Edit Connection Filters.”
11. Specify and add any User or Group exclusions and then click OK.
12. Complete above steps, we will configure a Synchronization Timer Job.
V. Configuring a Synchronization Timer Job
1. Enter CA -> Application Management -> Manage service applications.
2. Select “User Profile Service Application_test” user profile and click “Manage” on the ribbon menu.
3. Click “Configure Synchronization Timer Job.”
4. Enable the timer job and then start profile synchronization.

5. Enter CA -> Monitoring -> Check job status to see the profile synchronization status.
VI. Manage User Profile/Properties
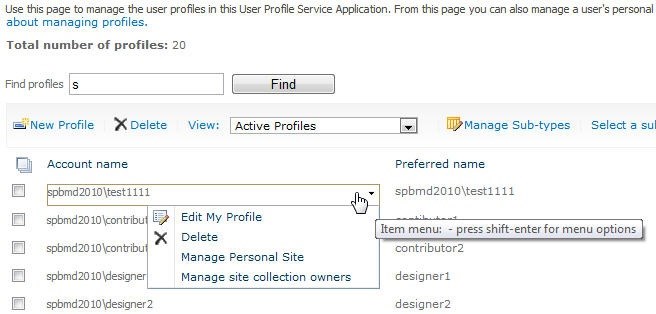
1. Finally, enter into Manage User Profiles and search for users – user information does not display by default, so you need to search them.
2. We also can add, edit, or delete user profiles to ensure that all the necessary Active Directory attributes were successfully imported.
We have now successfully completed a User Profile Synchronization!









Thanks!
Thanks, it really helped
thanks, its really helped!! 🙂